Video & Editing Settings for Fishing and Outdoor Adventures
Whether I’m out fly fishing on Yorkshire rivers, filming fishing or photography sessions in Scotland, or capturing coarse fishing days on the bank in North Yorkshire, getting the right GoPro settings makes a massive difference. Over time, I’ve tested different setups as seen on my YouTube channel.
The following settings are what I currently use for my outdoor videos.
I may update this post over time as I continue experimenting and improving the quality of my footage. I’ll mention I’ve updated it when the time comes or I’ll create a new blog linking to this one
——————————————-
Resolution/FPS: 1080p 60fps - This is the quality of the video I use. I could record in better quality but I will lose recording time. Currently it’s just over 7 hours. If I use something like 4K, it will drop down to only 4 hours recording time. I was thinking about buying a new memory card, but they’re A LOT of money, something I cannot currently afford. And batteries will drain quicker than using 1080.
Lens: Linear + HL - Linear gives a wide angle view of 19-34mm and gives the best angle of view for my videos. Any narrow and the video will look zoomed in, and on the other scale, an even wider view will make my videos look like a fish eye lens where everything has a bend on them. Horizon Levelling (HL) is what is means. Having this setting turned on makes the footage level.
Hypersmooth: Standard - This setting is the in-camera stabilization that is available on Hero 7 Black and newer cameras. It stabilizes the video, so the footage doesn’t shake all over the place.
PROTUNE SETTINGS
Bit Rate: High - The amount of data per second the camera records. Using a higher bit rate adds more information to the video resulting in a higher quality video. I set this to ‘high’.
Shutter: Auto - Leaving this setting to ‘auto’ lets the camera change the shutter speed at which your own eyes see
EV Comp: -0.5 - Effects how bright the video is. Good for sunny days. I may change to 0.0.
White balance: 5000K - I set this to either 5000K or 5600K then I don’t need to change the white balance when editing footage.
ISO Min: 100 and ISO Max: 400 - Provides more control in light conditions. A higher ISO will produce brighter footage, but may deteriorate the video quality by bringing in noise. A low ISO will produce clean footage with little or no noise on the video. This is why I leave the maximum ISO on only 400.
Sharpness: Medium - I change this setting to Medium because I hardly want to do any sharpness editing. Although saying that I always boost it after editing the video footage.
Colour: Natural - Youtube videos say to turn the Colour to Flat because then you can alter the colour yourself. But I find this annoying and it’s better to leave it on Natural then you don’t need to do much colour editing yourself.
RAW Audio: OFF - This setting is how much editing I want to do for audio. For my videos, what you hear is the raw audio with nothing done to it. I may up the volume on certain bits for you to listen to wildlife, but that’s all. I turn this setting to ‘off’.
Wind: AUTO - I use an external Mic, a DJI Mic (version one) and have done for a few years because I hated the wind noise on my first few videos. I don’t mess around with this setting.
THOUGHTS
You don’t need the newest camera or expensive equipment to make enjoyable fishing videos. Learning your camera settings and understanding lighting will improve your content far more than constantly buying new gear. If you don’t want fancy settings, then an older model will work just as well as the newest.
I’m still experimenting and learning every session, but the above settings have worked really well for my style of fishing and outdoor filming.
If you’ve got your own favourite GoPro setup for fishing videos, feel free to share down below — I’m always interested in testing new ideas on the river.
VIDEO EDITING
Once I have recorded footage, I take the lead from the camera and plug it in a USB on the computer and transfer files over to a separate drive.
I use Davinci Resolve (free version) to edit all my videos. It is the best video editing software out there, but there is a learning curve to be able to use it. Once you’ve learned it and used the software for a while, you’ll get the hang of it and able to do things quickly.
Editing is simple. I add my intro (custom made), then select and drag the video files to the time-bar. I then edit the boring bits out, add text, maybe even diagrams and photos. It can take me anything from 1 hour to 4 hours depending on how much footage I recorded that day.
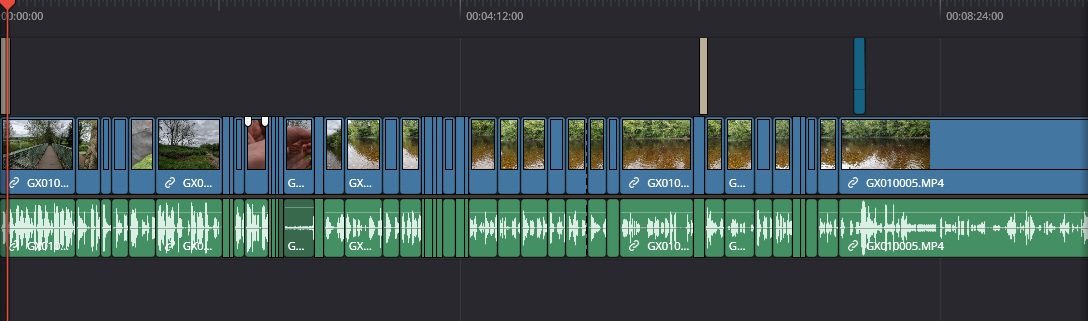
Once editing has finished, I play it from the beginning and watch it back. If I see part of a clip that’s boring and could be removed, then I remove it, and keep playing it back until I’ve watched all the footage. Of course these steps may not matter because I may decide to do an ‘unedited video’ like I did on this video (link).
Now comes Colour and Sharpening.
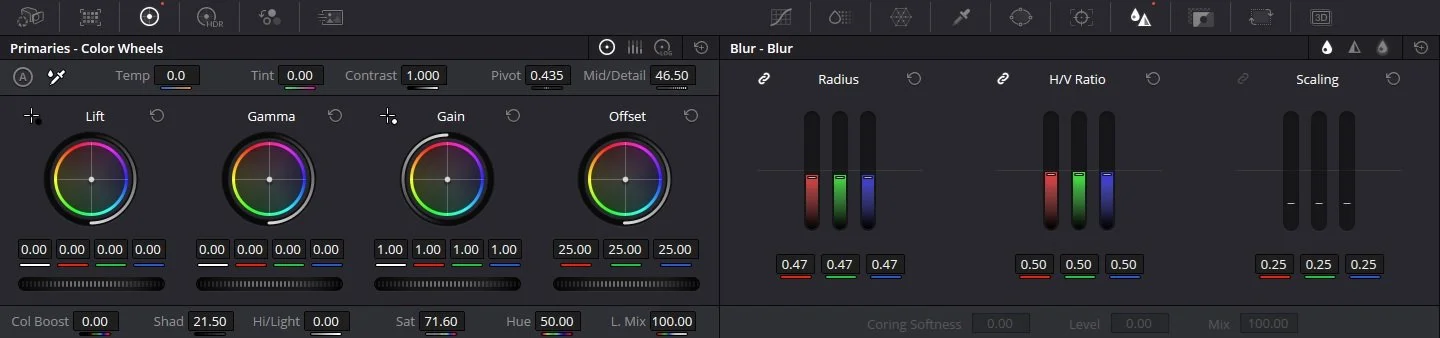
Colour can be tricky because I don’t want it to look unnatural like I’ve added too much colour to it. I lift the Shadows if there’s any dark areas to get more detail out of the video clips. I always boost the Saturation even though the in-camera setting does a good job, I prefer a little more colour added.
I alter the sharpness level. This comes under ‘Blur - Radius’ and ‘Mid/Detail’ as shown below. I copy and paste the settings to other clips to check if all is ok. I will be honest that I’m unsure about sharpening footage. So if you have any tips, then Comment down below.
I think I’m going to experiment using the Flat Colour profile and Low Sharpness on the GoPro, so I have to edit the colour and sharpness myself. I do it anyway, so why not? And there’s nothing wrong with experimenting with new settings.
I’ve edited my footage and edited the colour and sharpness of the video. Now it’s time to get it ready to upload to YouTube.
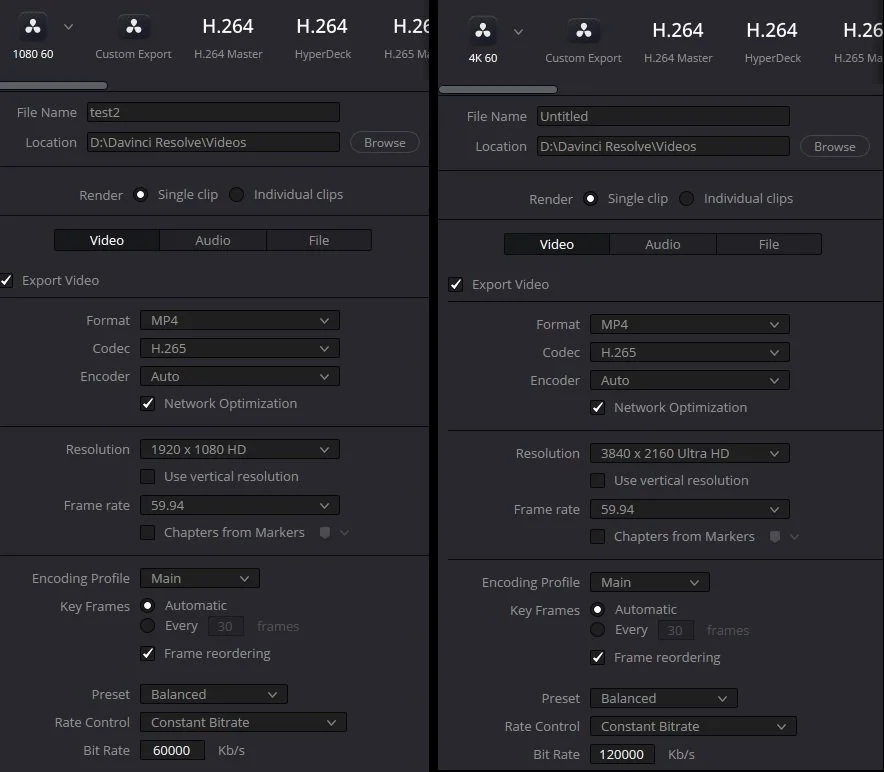
The following is what I use for 1080p, with 4K on the right side. As you can see there isn’t any difference other than the Bit Rate. It’s a general rule to have the bit rate doubled if you record in 4K. So if you record in 1080p with 60 FPS, your bite rate will be 60,000. But if you record in 4K 60, your bit rate will be doubled, so it will become 120,000. The higher the bit rate, the better quality the video will be. Once rendered, which can take some time depending on how long the video is, then all I need to do is to upload to YouTube.
— David